
Yunjia NRF51822
Support for the Yunjia NRF51822 board
Support for the Yunjia NRF51822 board
Overview
The NRF51822 module by Yunjia Technology is a minimalistic but very low- priced module utilizing Nordics NRF51822QFAA SoC. The SoC features 16Kb of RAM, 256Kb of flash ROM and apart of the usual microcontroller peripherals with a 2.4GHz radio that supports both Nordics proprietary ShockBurst as well as Bluetooth Low Energy (BLE).
The board is available for example on ebay or Aliexpress for around 8-10 USD.
Hardware
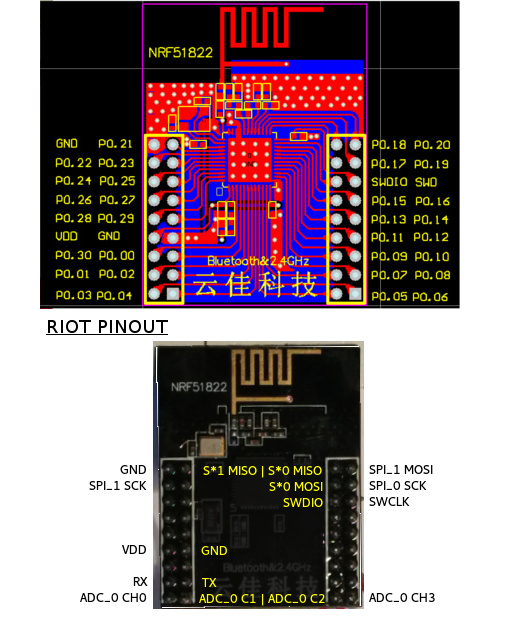
| MCU | NRF51822QFAA |
|---|---|
| Family | ARM Cortex-M0 |
| Vendor | Nordic Semiconductor |
| RAM | 16Kb |
| Flash | 256Kb |
| Frequency | 16MHz |
| FPU | no |
| Timers | 3 (2x 16-bit, 1x 32-bit [TIMER0]) |
| ADCs | 1x 10-bit (8 channels) |
| UARTs | 1 |
| SPIs | 2 |
| I2Cs | 2 |
| Vcc | 1.8V - 3.6V |
| Datasheet | Datasheet |
| Reference Manual | Reference Manual |
Flashing and Debugging
The Yunjia NRF51822 module comes without any on-board programming and flashing capabilities. It can be programmed using of-the-shelf programmers such as Segger’s JLink or STM’s STLink.
A very simple and affordable way to program and debug the Yunjia module is to use the integrated ST-Link/V2 programmer of most STM32 development board. The required steps are described in the following sections. If you want to use a standalone ST-Link adapter, you just simply have to alter the wiring to fit for your programmer, the software part is identical.
Hardware
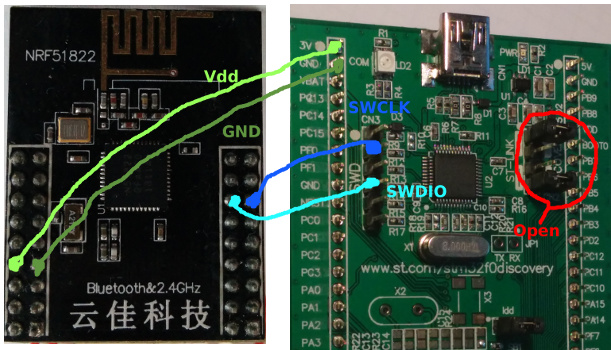
If you are using an STM32 discovery board, you have to enable the standalone ST-Link mode
by removing the two CN2 jumpers, found somewhere in the upper right part of
the board. This disconnects the ST-Link programmer from the microcontroller
part of the port and enables direct access through the pin-header CN3, also
labeled SWD.
The Yunjia NRF51822 module supports the Serial Wire Debug (SWD) interface. To access the device the following four lines need to be connected with the STM32x-discovery board:
Yunjia module STM32Fx-discoverycommon ground: GND <-----------> GNDsupply voltage: VDD <-----------> 3VSWD clock: SWD <-----------> SWCLK (CN3, pin2)SWD data I/O: SWDIO <-----------> SWDIO (CN3, pin4)The following image shows the wiring for an STM32F0-discovery board (although not the most beautiful…):
Programming the Device
RIOT’s provided functionality for debugging and flashing the Yunjia NRF51822 is based on the Open On-Chip Debugger tool. A guide with installation instructions and some other information can be found here.
You can flash the board by calling the following command:
BOARD=yunjia-nrf51822 make flashand voila, the new firmware should be flashed onto your device.
Resetting the Device
As the Yunjia module does not provide a reset button, RIOT includes a target to reset the board. To do that, just type
BOARD=yunjia-nrf51822 make resetand your board will reboot.
Debugging the Device
The debugging setup comprises of two parts: a GDB server and a GDB client. To usual workflow is to start the GDB server first and then connect to it with some kind of front-end (e.g. command line, IDE, …).
To start the GDB server, just type
BOARD=yunjia-nrf51822 make debug-serverThis will start a local GDB server on port 3333.
If you are fine with working with the GDB command line client, you can start debugging your device by just typing
BOARD=yunjia-nrf51822 make debugin a second terminal window. This will automatically connect to your previously opened GDB server and will also load your corresponding .elf file.
Alternatively you can configure your IDE (e.g. eclipse or similar) to connect directly to the GDB server. See here for more information on how to configureEclipse
Using UART
The default values are PIN 1: UART_RX and Pin 2: UART_TX (also compare
schematic above).
The BLE400 development board contains a CP2102 accessible through /dev/tty.SLAB_USBtoUART. You have to edit periph_conf.h to use it with UART_RX pin 11 and UART_TX pin 9.
The default Baud rate is 115200.
Troubleshooting
Protected at factory (error writing to flash at address 0x000… )
This step may be executed before the first programming of the board. OpenOCD provides the “nrf51 mass_erase” command to remove the protected flag on the bootloader region. RIOT does not use the proprietary Nordic “soft-device”. This is how to run the mass erase:
- Open two terminal windows.
- In one window, go to the RIOT root folder and run the regarding OpenOCD
configuration script with:
openocd -f boards/yunjia-nrf51822/dist/openocd.cfg. - In the second terminal, connect to the device via telnet:
telnet 127.0.0.1 4444. - If you are successfully connected via telnet, first type
haltand thennrf51 mass_erase.
This should have erased the whole memory of the device.